If you are currently troubleshooting your container setup and wondering why your indoor ginger plant dying all of a sudden, you are not alone in facing this underground hurdle. Growing your own fresh ginger root inside the house is a fantastic, long-term project for any indoor edible enthusiast. Ginger is a beautiful tropical plant that produces striking, bamboo-like green stalks that emit a refreshing, spicy aroma when brushed. However, because ginger is technically an underground rhizome rather than a standard root-based houseplant, it has highly specific soil and moisture requirements. It is incredibly common for beginner indoor gardeners to watch the emerging shoots turn pale yellow, dry up at the tips, or collapse into a mushy heap at the base.
If you are currently troubleshooting your container setup and wondering why your indoor ginger plant is dying all of a sudden, your plant is struggling with an underground structural issue. Ginger is a native of warm, humid jungle undercanopies. When it is confined to a tight plastic indoor pot filled with heavy, compacted potting soil, the conditions quickly lead to root suffocation and rhizome rot.
Fortunately, because ginger stores massive amounts of moisture and cellular energy inside its underground rhizome, it can survive harsh periods of environmental stress. Unless the entire underground root chunk has completely dissolved into a foul-smelling liquid mush, you can reverse the damage. Here is the ultimate text-based diagnostic guide to uncover exactly what is killing your kitchen herb and the 5 best simple fixes to revive it.
Understanding Ginger Anatomy: The Rhizome Factor
To successfully fix a dying ginger plant, you must understand how this unique plant functions biologically. The thick ginger piece that you cook with is not a root; it is a rhizome, which is an underground modified stem. This rhizome acts as a massive biological storage battery. It holds all the water, starches, and nutrients the plant needs to push up those tall green leafy stalks.
The actual roots grow out of the bottom of this rhizome to drink water, while the growth buds or eyes push upward to create the green stems. Because the rhizome is a thick, fleshy structure, it is highly susceptible to moisture retention. If the soil stays damp for too long, the outer skin of the rhizome softens, allowing fungal pathogens to enter and eat the starch storage cells from the inside out, which quickly manifests as dying top growth.
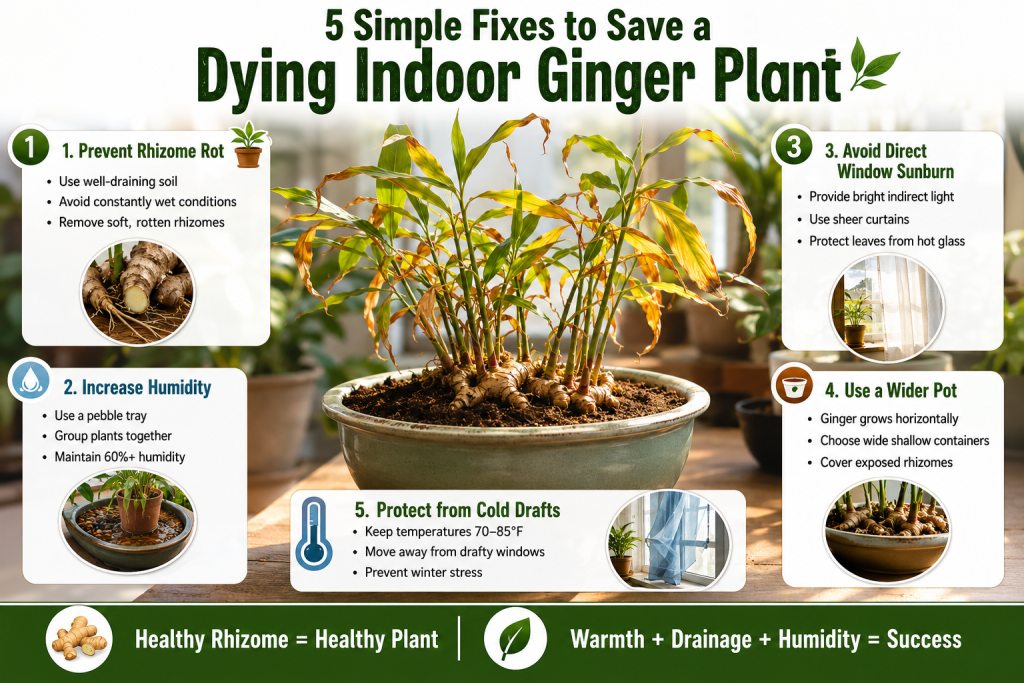
1. Saturated Potting Soil is Causing Rhizome Rot
By far, the number one reason an indoor ginger plant begins to decline is overwatering combined with poor container drainage. In its natural environment, ginger grows in loose, rich jungle leaf mold that drains water instantly. If you use standard, heavy garden soil or a potting mix that lacks coarse aeration elements, water pools around the fleshy rhizome, cutting off all root respiration.
The Warning Signs
- The lower leaves turn a soft, washed-out yellow color, and the main vertical green stalks feel loose or wobbly when you gently wiggle them.
- The soil remains constantly muddy, wet, and takes more than a week to dry out on the surface.
- If you gently brush away the top layer of soil, the ginger rhizome looks dark brown or black, feels soft or squishy to the touch, and emits a sour, fermented odor.
The Simple Fix
- The Soil Aeration Overhaul: If your soil is muddy, dig up the surviving firm pieces of the rhizome immediately. Discard any squishy parts. Replant the healthy sections in a lightweight, loose potting mix amended heavily with coarse perlite, orchid bark, or coconut coir at a three-to-one ratio.
- The Drying Window: Never water ginger on a fixed weekly routine. Always insert your finger two to three inches deep into the potting medium. If it feels even slightly damp, skip watering. Let the soil dry out significantly before applying water again.
2. Low Indoor Humidity is Drying Out the Leaf Tips
Because homes use artificial heating and air conditioning systems, indoor air is notoriously dry compared to the natural tropical climate ginger naturally craves. Ginger thrives when ambient relative humidity levels are kept above sixty percent. When forced to live in dry indoor air, the plant cannot pump moisture to the outer edges of its tall leaves fast enough, causing them to dry up and look scorched.
The Warning Signs
- The very outer margins and tips of the long green leaves turn a papery, brittle brown while the central veins remain green.
- The leaves begin to curl inward along their length to protect themselves from dry air currents.
- The plant stops pushing out new green shoots entirely, entering a protective stagnant state.
The Simple Fix
- Create a Humidity Microclimate: Place your ginger container on a shallow tray filled with gravel or pebbles and pour water into the tray just below the top of the stones. As the water evaporates, it creates a constant bubble of humid air directly around the foliage.
- Group Your Edibles: Keep your indoor edibles clustered closely together. Plants naturally release moisture through their leaves via transpiration, so grouping them creates a shared, highly beneficial humid microclimate.
3. Direct Glass Window Sunburn
While ginger requires bright light to generate enough energy to grow thick underground roots, it is fundamentally an understory plant. In the wild, it grows beneath the filtered canopy of giant jungle trees, receiving bright, indirect dappled light rather than harsh, blinding sun rays. Many indoor growers place their ginger pots right against a hot, uninsulated window pane, which acts like a magnifying glass.
The Warning Signs
- Large, bleached white or pale yellow patches develop across the upper surfaces of the leaves that face the window directly.
- The leaves look dry, scorched, and crispy within a few days of being moved to a new windowsill.
- The leaf tissue feels brittle and dies off rapidly, while the sheltered backside of the plant remains green.
The Simple Fix
- Provide Filtered Light: Move your ginger container back a few feet from any south-facing or west-facing windows. It should sit in a location where it receives bright, indirect light all day long.
- Use Sheer Curtains: If you must keep the plant on a bright windowsill, hang a sheer, thin curtain between the glass pane and the pot to diffuse the intense afternoon solar radiation.
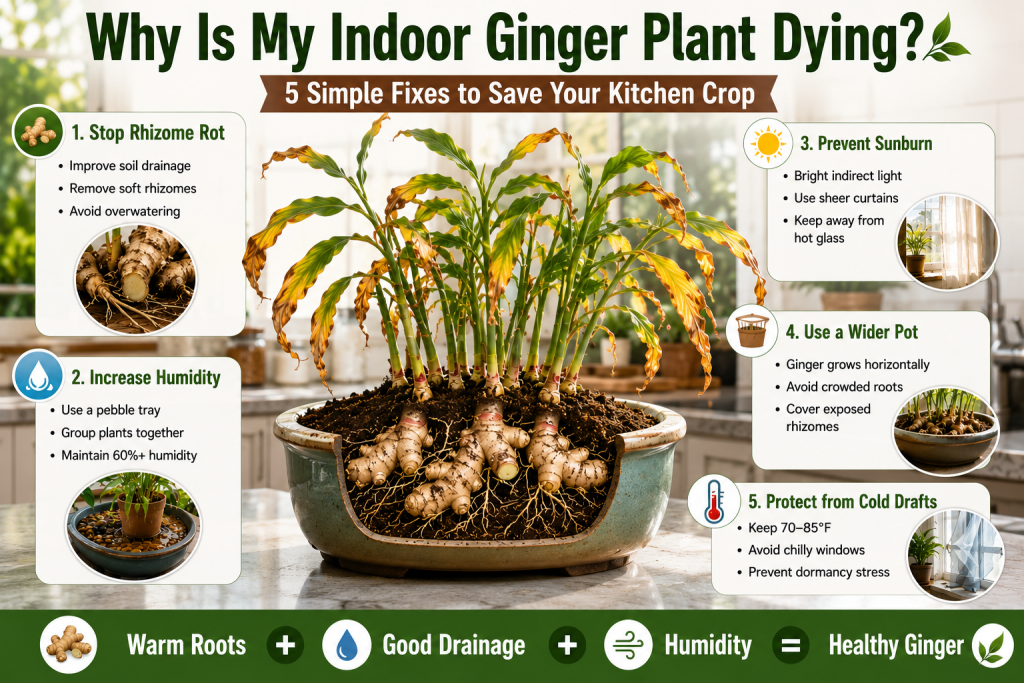
4. Shallow Planting and Confined Pots
Ginger rhizomes do not grow straight down into the dirt like carrots; they grow horizontally, creeping along just beneath the surface of the soil. If you plant your ginger in a narrow, deep houseplant pot, the rhizome will quickly hit the hard plastic edges of the container, causing it to become root-bound, stunted, and eventually die back from lack of structural space.
The Warning Signs
- The ginger rhizome physically pushes its way out of the soil, exposing its bare pink and green growth buds to the dry indoor room air.
- The tall green stalks begin to fall over because the shallow root zone cannot provide enough physical leverage to keep them anchored.
The Simple Fix
- Switch to Wide, Shallow Containers: Always plant indoor ginger in wide, shallow pots or long window planter boxes that are at least twelve to fifteen inches wide and only eight to ten inches deep. This provides ample horizontal runway space for the rhizomes to expand outwards.
- The Hilling Method: If you see the tops of the rhizomes emerging above the dirt line, simply sprinkle a fresh one-inch layer of rich potting mix or compost over them to shield them from light and air, just like hilling potatoes.
5. Sudden Cold Drafts and Winter Dormancy
Ginger is completely intolerant of chilly weather. Its metabolic processes begin to shut down whenever ambient room temperatures drop below 55°F (13°C). If your indoor ginger plant is sitting near a drafty exterior door or an uninsulated window during the winter months, the sudden temperature drop can trick the plant into thinking winter has arrived, causing it to shed its leaves and go into a deep dormancy state.
The Warning Signs
- All the tall green stalks turn a uniform yellow color, lose their strength, and cleanly snap off at the soil line over a period of two weeks.
- The underground rhizome remains completely firm and healthy, without any foul smell or squishiness.
The Simple Fix
- Maintain Consistent Warmth: Keep your indoor grow space between 70°F and 85°F (21°C to 29°C) to mimic a permanent tropical summer. Move the pot away from cold entryways, drafty hallways, and chilly window sills.
- Manage the Dormancy Cycle: If your plant has already dropped its leaves due to winter dormancy, do not panic. Stop watering the soil entirely so the bare rhizome doesn’t rot. Keep the dry pot in a warm closet for two months, then bring it back out into the light and water it lightly to awaken the growth eyes for spring.
Conclusion
Saving an indoor ginger plant dying in its container is all about achieving the correct balance beneath the soil line. By switching to a highly aerated potting mix to put a complete stop to rhizome rot, placing the pot in bright but indirect sunlight to avoid leaf sunburn, and keeping indoor humidity elevated with a simple pebble tray, you can easily rescue your crop. Ginger is an incredibly resilient tropical herb; as long as you keep its underground storage battery dry and warm, it will gladly push out a continuous harvest of fresh, aromatic stalks and spicy roots for your kitchen.
Frequently Asked Questions
1. How long does it take to grow and harvest full ginger bulbs indoors?
Ginger is a slow, patient crop. While it will push up beautiful green ornamental stalks within a few weeks of planting, it takes roughly eight to ten months of continuous, warm growth for the underground rhizome to expand into a sizable, multi-segmented bulb cluster that is ready for a substantial kitchen harvest. However, you can gently dig around the edges and snip off tiny pieces of new ginger root after four to five months without harming the main plant.
2. Can I plant a regular ginger root from any grocery store?
Yes, you can absolutely use standard grocery store ginger, but there is a catch. Many commercial spice distributors spray conventional ginger with a synthetic growth inhibitor chemical to keep it from sprouting on store shelves. To ensure success, soak your store-bought ginger thumb in a bowl of warm water overnight to wash away any chemical residues, or simply purchase certified organic ginger from a local farmers’ market, which will sprout much faster and cleaner.
3. Why are the stalks of my indoor ginger plant falling over?
If your ginger stalks are growing tall but falling over, your plant is likely suffering from a lack of light or shallow planting. When ginger doesn’t receive enough light energy, it grows thin, weak, and leggy as it stretches toward the nearest window, making the stems too top-heavy to stand up. Ensure the container is wide enough for the roots to anchor themselves securely and supplement with an overhead grow light if necessary.
4. What should I do if my indoor ginger rhizome has a small soft spot?
If you detect a small soft spot during an inspection, you can easily perform surgery to save the rest of the plant. Use a sterile knife to cut away the squishy, rotting section completely until you reach clean, crisp white flesh. Let the healthy piece sit out on a kitchen counter for twenty-four hours so the cut wound can form a dry, calloused skin, then replant it in fresh, dry, well-draining soil.
5. How often should I fertilize an indoor ginger plant?
Ginger is a heavy feeder because it requires a lot of nutrients to build those thick, starch-filled underground rhizomes. Once the green stalks are six inches tall, feed your plant once every three to four weeks with a balanced, organic liquid fertilizer or a phosphorus-rich organic kelp meal. Always avoid over-fertilizing with harsh synthetic chemicals, which can quickly burn the sensitive root hairs inside an indoor container system.